Removing the charger from your Nissan Leaf can sometimes feel daunting, especially if you’re in a hurry or facing technical issues. Did you know that knowing the right steps can save you time and prevent potential frustration? Properly disconnecting your charger not only ensures the longevity of your electric vehicle’s components but also enhances your overall charging experience. Whether you’re dealing with a stubborn connection or just want to ensure a smooth disconnection process, following these simple steps can make all the difference. Dive into our guide to learn how to effortlessly remove your Nissan Leaf charger in just three easy steps, ensuring you have the confidence to handle this essential task whenever needed.
Choosing the Right Tools for Removing Your Nissan Leaf Charger
is essential for ensuring safety and efficiency during the process. A well-prepared approach not only simplifies the task but also minimizes the risk of damage to the vehicle or charger components. For the removal process, you will generally need a few basic tools that you might already have at home or in your garage.
Start with a strong and reliable flashlight. This tool is especially useful for illuminating any dark or tight areas around the charger and battery compartment. You will also want a soft cloth or microfiber towel to clean any surfaces around the connection points, as debris can impede the removal process. A set of screwdrivers (typically Phillips and flathead) will come in handy if you encounter any screws obstructing parts that need to be moved for better access.
Additionally, having a pair of rubber gloves can protect your hands and reduce the risk of electric shock, especially while handling electrical components. If the charger is stuck, a flat pry tool or a plastic trim tool can be useful for gently easing it out without causing damage to the charger or surrounding areas.
Lastly, ensure you have access to the owner’s manual for your Nissan Leaf, which may provide specific guidance regarding your model and any unique tools that might be needed for successful charger removal. Being well-equipped will make the process smoother and more efficient.
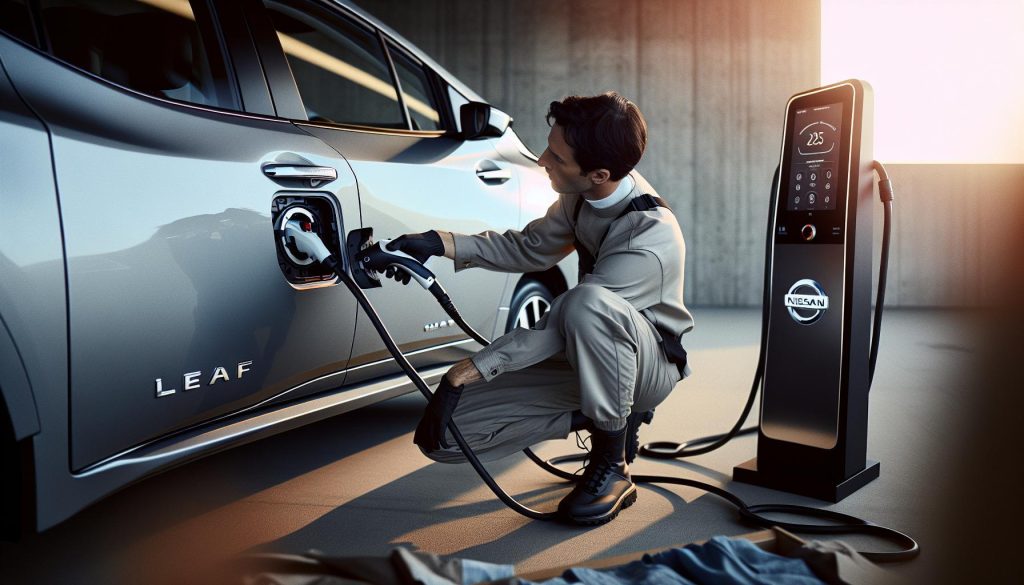
Step-by-Step Guide to Disconnecting the Nissan Leaf Charger
To effectively disconnect the charger from your Nissan Leaf, following a systematic approach is vital for ensuring both safety and efficiency. The process can be straightforward if you keep a few key steps in mind and approach it with a clear plan.
First, ensure that the vehicle is powered off completely. This is crucial as it reduces the risk of electric shock. After that, locate the charging port. Carefully inspect it for any locks or levers that must be disengaged. Most models require you to simply push the button on the charger itself. For those equipped with a CHAdeMO plug, you’ll need to press down on the release button while gently pulling the plug away from the car. If resistance is felt, do not force it; instead, verify that the release mechanism is properly engaged.
In case you encounter a stuck charger, there are a few additional steps you can take. Check if the vehicle is in park and ensure that the power switch is in the OFF position. If the charger is still stuck, consider opening the hood to access any potential emergency release systems. Also, pressing the emergency stop button can sometimes help reset the charging connection, allowing for easier removal. If these efforts do not yield results, patience is key; sometimes letting the system reset for a few minutes can resolve the issue.
Once successfully disconnected, it’s a good practice to inspect both the charger and the port for any damage or debris that may impede future connections. This attention to detail not only enhances the safety of future charging sessions but also prolongs the lifespan of both the charger and the vehicle’s charging port. Engaging in this step-wise process ensures a secure and effective charger removal, minimizing potential hassles in the future.
Safety Precautions Before Removing the Charger
Before attempting to disconnect the charger from your Nissan Leaf, it’s crucial to consider a few important safety precautions to ensure a smooth and secure process. The first step involves checking the power status of your vehicle. Always ensure that the vehicle is completely powered off; this reduces the risk of electric shock and helps prevent potential damage to the vehicle’s electrical system. Double-check that the power switch is in the OFF position, and confirm that the key fob is out of the vicinity.
Protective Gear and Environment
While it may not seem necessary, wearing protective gloves can provide an additional layer of safety. These gloves can protect your hands from any accidental contact with metal components within the charger or the vehicle itself. Moreover, always ensure that you are in a dry environment while handling the charger. Wet conditions increase the risk of electrical hazards, making it imperative to work in a clean, dry area. If you’re outdoors, avoid disconnecting the charger during inclement weather, which could complicate the process and pose safety risks.
Awareness of Surroundings
Being mindful of your surroundings is equally important. Look out for any trip hazards or obstacles that could cause accidents during the disconnection process. If you’re near other vehicles or charging stations, maintain a safe distance to avoid potential accidents. Additionally, keep the area clear of unnecessary bystanders, particularly children or pets, who may interfere or inadvertently cause safety concerns.
Follow Manufacturer Guidelines
Finally, it’s essential to consult and follow the manufacturer’s guidelines and instructions specific to your Nissan Leaf model. Familiarizing yourself with the vehicle’s charging mechanisms can prevent confusion and ensure you use the appropriate techniques for safe removal. Each model may have particular requirements or nuances, so reviewing your owner’s manual can provide valuable insights into safely disconnecting the charger. Keeping these safety precautions in mind will create a secure environment for removing the charger and minimize the risk of accidents.
Common Issues When Removing the Charger and How to Fix Them
Removing the charger from your Nissan Leaf is usually a straightforward process, but there can be a few common issues that arise, potentially complicating your task. One of the frequent concerns is dealing with a stuck charging cable. This can happen for several reasons, such as the vehicle still being in a locked state or an issue with the charging station itself not releasing the cable. If you find that the charging cable won’t budge even after pressing the release button, try checking the vehicle’s status. It should be fully powered off, and make sure no charging process is actively occurring. If it remains unresponsive, disconnecting the charger from the power outlet, if accessible, might solve the problem.
Sometimes the release button may fail to respond due to wear or damage, leading to frustration. If this occurs, ensure that you press firmly while also pulling gently on the plug. If the button seems stuck, consider lightly wiggling the plug while applying pressure. In extreme cases, you may need to reset the vehicle’s electronic systems. Removing the key fob from proximity to the vehicle and then re-entering can sometimes help reset any electronic hold-ups.
Battery depletion or failure is another issue that can arise. If the charger isn’t operational, it could be because the battery is too low or a fault has occurred. In such cases, using the Nissan Leaf’s infotainment system to check for error messages related to the battery or charging system can provide useful insights. Solutions may involve jump-starting the system or, in persistent cases, seeking professional help to diagnose potential faults.
Lastly, environments with extreme temperatures can influence the performance of your charger. During freezing weather, the battery management system might prevent disconnection if the vehicle isn’t recognizing safe levels of operation. Conversely, excessive heat can lead to thermal shutdowns. If you’re in such conditions, it’s advisable to wait until the temperature stabilizes or moves the vehicle to a more moderate climate before attempting to disconnect the charger again.
By being aware of these common issues and having practical troubleshooting steps at the ready, you can greatly simplify the removal process and ensure a smoother experience.
Troubleshooting Charger Removal Problems
When facing difficulties in removing the charger from your Nissan Leaf, it’s essential to address potential problems methodically. Many users encounter issues such as stuck charging cables, often stemming from the car’s power state or a malfunction in the charging station itself. If the cable is unresponsive even after pressing the release button, ensure your Leaf is entirely off and that the charging process has concluded. Disconnecting the unit from the power outlet, if feasible, can sometimes reset the system and restore functionality.
If the release button seems unresponsive, it could be due to wear and tear. In such cases, applying firm pressure while gently wiggling the plug can help. If the button appears jammed, consider resetting your vehicle’s electronic systems: removing the key fob from proximity for a few moments before re-entering can clear electronic glitches that may be halting the release process. Moreover, if the battery level is critically low or if an error message appears on the infotainment system, troubleshooting the battery and ensuring proper functionality is crucial before proceeding with charger removal.
Extreme weather conditions can also influence charger disconnection. In cold temperatures, the battery management system may restrict the charger’s removal to ensure safe operational parameters are met. On the other hand, excessive heat can lead to thermal shutdowns. If you’re grappling with temperature-related issues, it may be wise to wait until ambient conditions stabilize before attempting to disconnect the charger again.
Lastly, documenting common issues and the steps you’ve taken can empower you to manage future removals with greater confidence and efficiency. Understanding these troubleshooting methods can transform a frustrating situation into a straightforward task, allowing for a smoother experience with your Nissan Leaf’s charging system.
Post-Removal Checklist for Your Nissan Leaf
After successfully removing the charger from your Nissan Leaf, it’s crucial to follow a post-removal checklist to ensure your vehicle remains in optimal condition. Neglecting these steps can lead to issues that may affect future functionality or safety. Here’s what you should consider after disconnecting your charger.
First, inspect the charger and the plug for any signs of wear or damage. Look for cracks, frayed wires, or corrosion on the connectors. These could compromise the charging efficiency and safety of the system. If any damage is detected, replace the charger or the connector before the next use to prevent further complications. Additionally, ensure the charging port on your Leaf is clean and free of debris. Use a soft cloth or brush to gently clear any dirt or residue that might have accumulated.
Next, check the state of your Leaf’s battery. After removal, monitor the battery level and make a note of its condition. If the battery seems to drain faster than expected, consider visiting a service center for an evaluation. It’s also wise to reset any error messages that may appear on your dashboard, as they may affect future charging sessions. Engaging the vehicle’s electronic systems, such as shutting down and restarting, can help clear temporary glitches.
Lastly, keep a record of the charging sessions and any anomalies during the removal process. This information can be invaluable for identifying patterns or recurring issues that might arise over time. Regularly updating this log will not only aid in troubleshooting but also facilitate discussions with technicians should you need professional help.
By completing these steps, you enhance the longevity of your charging system and ensure a seamless experience each time you connect your Nissan Leaf for a charge. Remember, a proactive approach to maintenance is key to enjoying the full benefits of electric vehicle ownership.
Maintaining Your Nissan Leaf Charger for Future Use
To ensure your Nissan Leaf charger remains efficient and reliable for future use, consistent maintenance is essential. Just as with any component of your electric vehicle, neglect can lead to reduced performance and potential safety issues. Regular checks can help you detect problems before they escalate, prolonging the life of your charger and enhancing the overall functionality of your vehicle.
Begin with a routine inspection of both the charger and the charging port. Look closely for signs of wear, such as cracks, frayed wiring, or corrosion on metal connectors. Even minor damage can hinder charging efficiency or create safety hazards. If you notice any of these issues, it’s vital to replace the affected parts promptly. Keeping the charging port clean is equally important; dust and debris can accumulate and interfere with the electrical connection. A simple wipe with a soft cloth or a gentle brush can help maintain a clean surface for optimal charging.
In addition to physical inspections, monitor your charging performance regularly. Take note of any irregularities, such as longer-than-usual charging times or failure to initiate charging. Keeping a log of your charging sessions and any anomalies can provide valuable insights over time, making it easier to address recurring issues or discuss them with a professional. If your battery seems to deplete faster than expected, consider scheduling a check-up to evaluate its health.
Lastly, be mindful of how you store your charger when it’s not in use. Keep it in a dry, cool place away from direct sunlight to prevent overheating and degradation. When handling the charger, avoid yanking or twisting the cables, which can cause internal damage over time. By following these straightforward maintenance guidelines, you can maximize the life and efficiency of your Nissan Leaf charger, ensuring that it serves you well for all your electric driving needs.
Alternative Charging Solutions for Your Nissan Leaf
Finding the right charging solution for your Nissan Leaf can significantly enhance your electric driving experience. While using the standard charger provided with your vehicle is essential, exploring alternative charging options can ensure you’re never stranded without power. Notably, the Nissan Leaf is compatible with various charging methods that can fit different lifestyles and scenarios.
Public Charging Stations
One convenient alternative is utilizing public charging stations, which have become increasingly prevalent. Many cities have embraced electric vehicle (EV) infrastructure, offering Level 2 and DC fast chargers at strategic locations, such as shopping centers and highway rest stops. Embracing these options not only allows for quicker charging times but also helps to keep your battery topped off during errands. Websites and apps like PlugShare or ChargePoint provide maps and availability status, making it easy to locate charging points near you.
Home Charging Solutions
Installing a Level 2 charging station at home can be another effective solution. This option provides faster charging compared to a standard household outlet and allows for the convenience of charging overnight. Several companies offer home charging units designed specifically for Nissan Leaf vehicles, which can significantly reduce downtime. Additionally, if you have solar panels, you can harness renewable energy to power your Leaf, making charging more environmentally friendly and potentially reducing your electricity costs.
Mobile Charging Services
In some regions, mobile charging services have emerged, providing on-demand charging directly at your location. These services can be particularly useful in emergencies or when you’re unable to reach a charging station. By simply scheduling a service through an app, you can have a provider come to your vehicle, delivering an appropriate charge to get you back on the road.
Exploring these alternative charging solutions gives Nissan Leaf owners peace of mind and flexibility. By choosing a combination of public charging stations, home setups, and mobile services, you can tailor your electric vehicle experience to fit your lifestyle seamlessly.
Frequently asked questions
Q: How do I safely remove the charger from my Nissan Leaf?
A: To safely remove the charger from your Nissan Leaf, ensure the vehicle is powered off. Open the hood, and disengage the charger connection carefully, following the instructions in your owner’s manual. Always refer to the safety precautions section of your guide for specific details.
Q: What tools do I need to remove the Nissan Leaf charger?
A: You typically need basic hand tools such as a socket set, a screwdriver, and potentially a jack for lifting the vehicle. Refer to the “Choosing the Right Tools” section of your guide for a detailed list tailored to your specific model.
Q: Are there any special precautions to take when removing the charger?
A: Yes, always ensure the vehicle’s power is off and the charger is unplugged. Wear safety gloves and goggles to protect yourself from potential hazards. Review the safety precautions in your guide for additional tips to ensure a secure and safe removal process.
Q: How can I troubleshoot issues when removing my Nissan Leaf charger?
A: If you encounter issues, start by checking if the charger is properly disconnected from its power source. Consult the “Troubleshooting Charger Removal Problems” section in your guide for further solutions, which may include checking for error codes or physical obstructions.
Q: Why might my Nissan Leaf charger be difficult to remove?
A: Difficulty in removing the charger may arise from improper disconnection, dirt or debris in the ports, or a malfunctioning charger. It’s essential to follow the removal steps carefully as outlined in your guide to avoid damage.
Q: When is the best time to remove the charger from my Nissan Leaf?
A: The best time to remove the charger is when you are ready to either perform maintenance or if the charger malfunctions. Always ensure the vehicle is powered down before proceeding, as noted in your charger removal guidelines.
Q: What should I do after removing the charger from my Nissan Leaf?
A: After removing the charger, perform a post-removal checklist, including inspecting the connection points and covering any exposed areas to prevent dust and moisture build-up. Refer to the “Post-Removal Checklist” section in your manual for complete guidance.
Q: Can I reinstall the charger myself after removal?
A: Yes, you can reinstall the charger yourself by following the manufacturer’s instructions. Make sure all connections are secure and that you have checked for any potential issues. For detailed steps, refer to your charger installation guidelines within the main article.
Concluding Remarks
Removing your Nissan Leaf charger doesn’t have to be complicated! By following the simple steps outlined in our guide, you can effortlessly detach your charger and streamline your EV experience. Remember, mastering these techniques not only ensures your safety but also enhances your overall EV usage. Don’t wait-get out there and apply this knowledge today!
If you found this guide helpful, check out our detailed article on the Nissan Leaf Maintenance Tips to keep your vehicle in top shape, or explore our Essential EV Charging Options to maximize your driving range. For more valuable insights, don’t forget to sign up for our newsletter and join our community of Nissan enthusiasts! We love hearing from you, so share your thoughts or questions in the comments below. Keeping your Nissan Leaf and its charger in sync will take your EV experience to the next level!


